Open ID Connect (OIDC) vs OAuth2.0: Which can Secure your Application Better? | With Keycloak Integration


Get to know about the Open ID Connect and how is it taking over the default choice protocol- OAuth for most of the developers in the domain. We will also discuss about one of the most popular CNCF Incubating project Keycloak, implementation, contributions and the major difference been experienced between the OAuth and Open ID Connect.
Securing our Application has been a major issue recently, thus attracting a lot of big leaders in the industry to contribute and save up the domain. With the traditional methods of saving our application, we were left far behind the trail thus showing the way to the project like OIDC to come forward and contribute into this concern.
Keycloak joined CNCF helps in adding authentication to applications and secure services with minimum effort with no need to deal with storing users or authenticating users. It provides user federation, strong authentication, user management, fine-grained authorization. Developers have been pushing it into their application portfolio stack, especially handling a role-based access control (RBAC) because the application runtime environments are getting more complex and variant from physical servers to cloud with Kubernetes and Linux container packages in terms of high scalability, flexibility, and portability.
Keycloak also joined CNCF as one of it's incubating project in April 2023 due to it's high efficiency and usability in the landscape and domain.

Before moving any forward to OAuth and Open ID Connect, let's first discuss and overview the Keycloak:
Keycloak
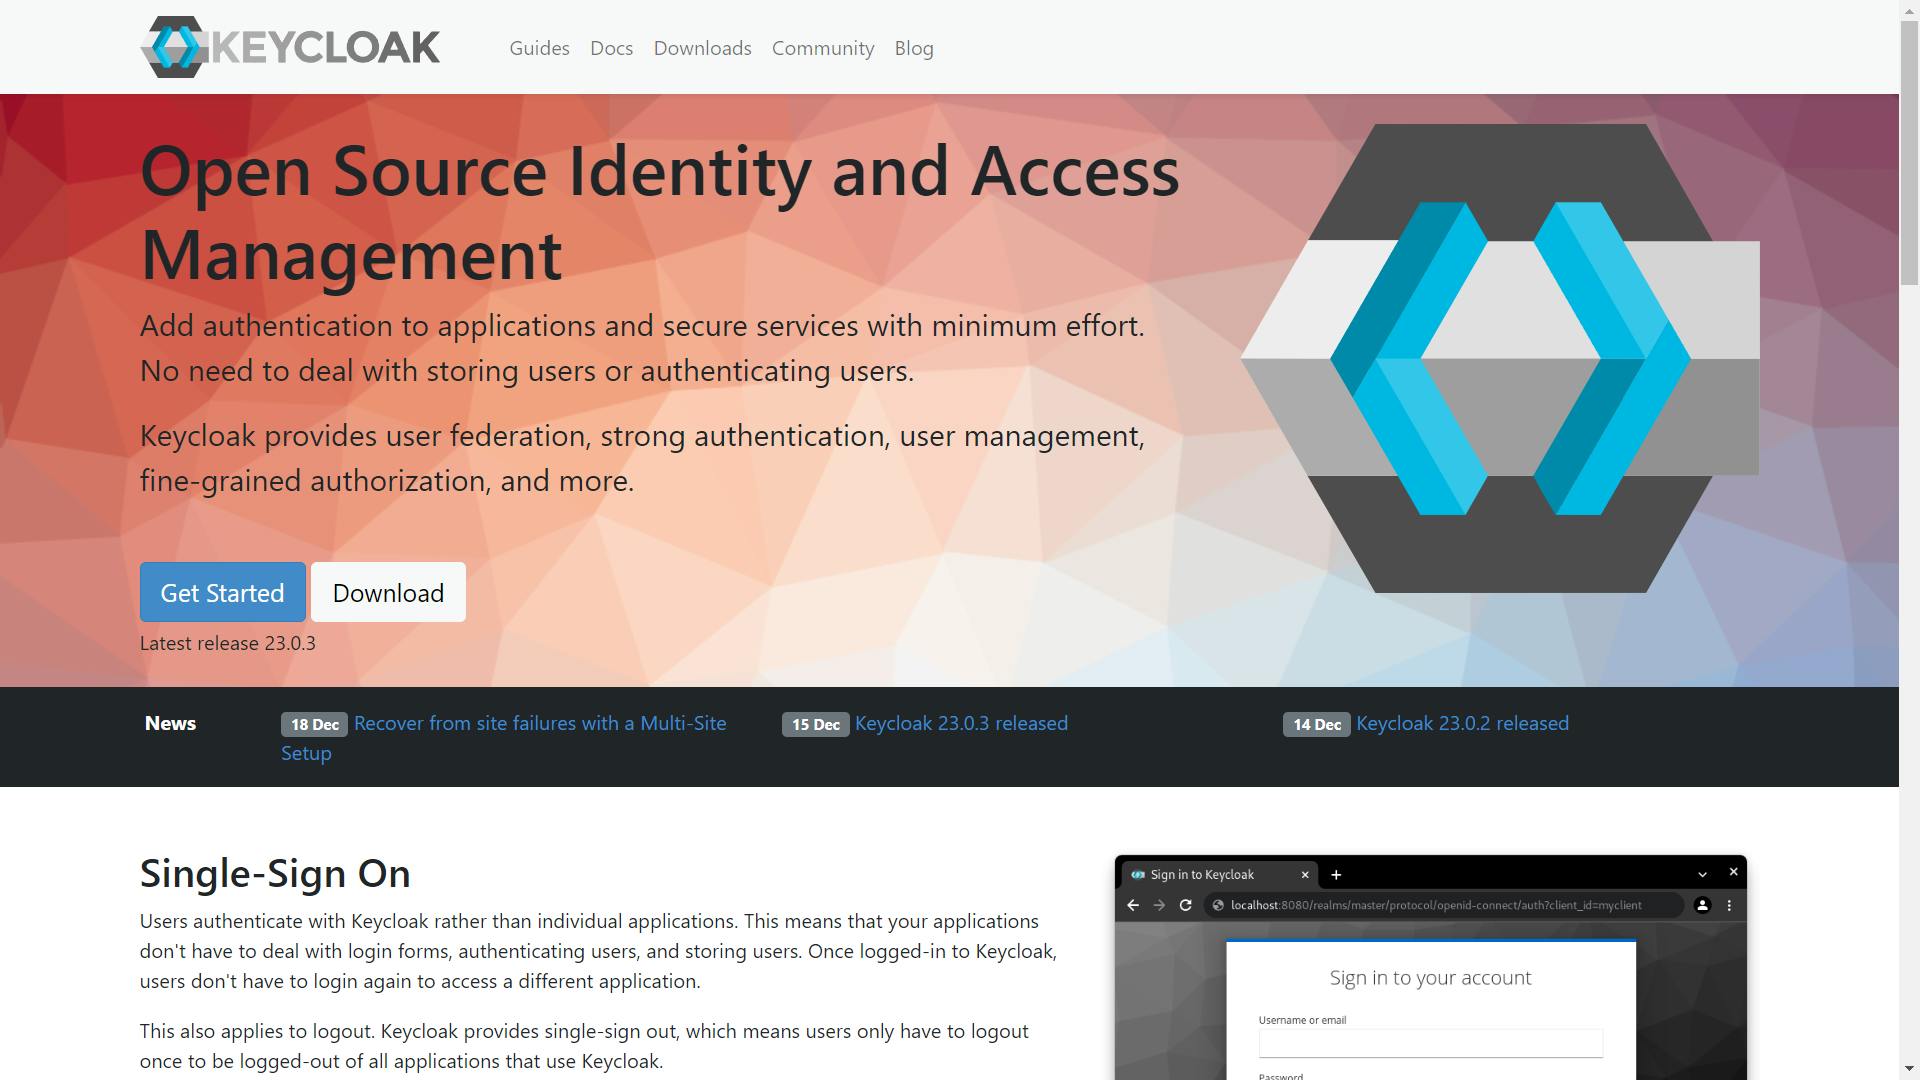
Keycloak is a highly efficient Open Source Identity and Access Management tool used for adding authentication to applications and secure services with minimum effort with no need to deal with storing users or authenticating users. It provides user federation, strong authentication, user management, fine-grained authorization and many more features helping out the developers to secure there applications and focus more on their main product
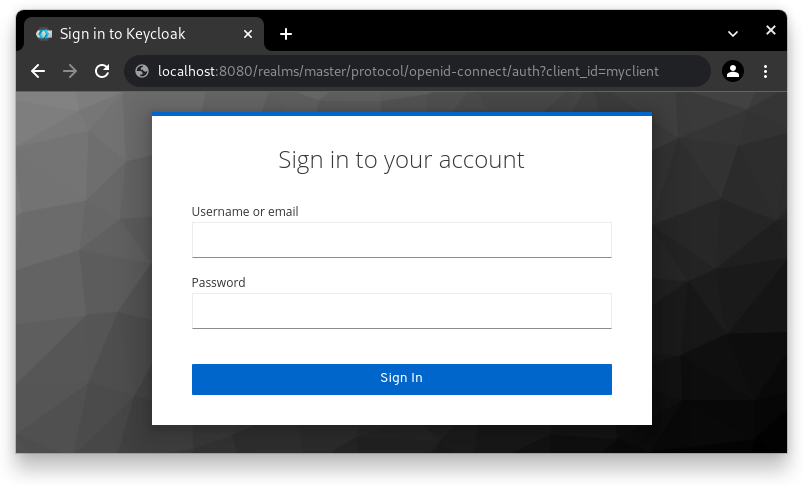
Single-Sign On
Users authenticate with Keycloak rather than individual applications. This means that your applications don't have to deal with login forms, authenticating users, and storing users. Once logged-in to Keycloak, users don't have to login again to access a different application.
This also applies to logout. Keycloak provides single-sign out, which means users only have to logout once to be logged-out of all applications that use Keycloak.
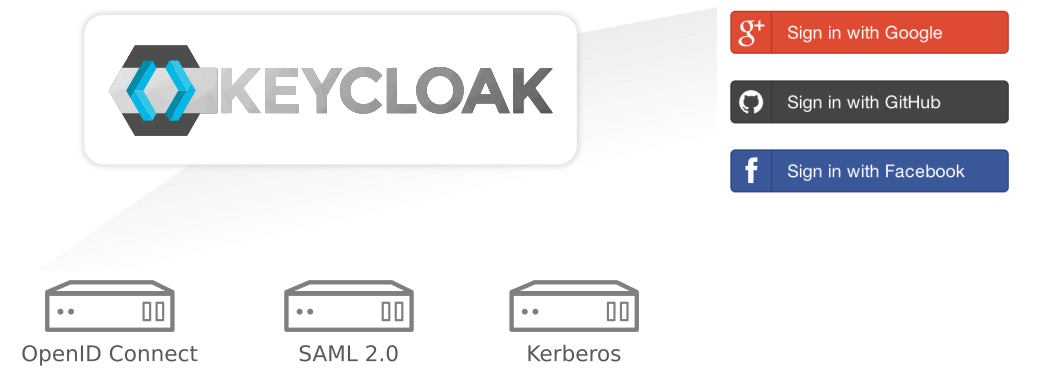
Identity Brokering and Social Login
Enabling login with social networks is easy to add through the admin console. It's just a matter of selecting the social network you want to add. No code or changes to your application is required.
Keycloak can also authenticate users with existing OpenID Connect or SAML 2.0 Identity Providers. Again, this is just a matter of configuring the Identity Provider through the admin console.
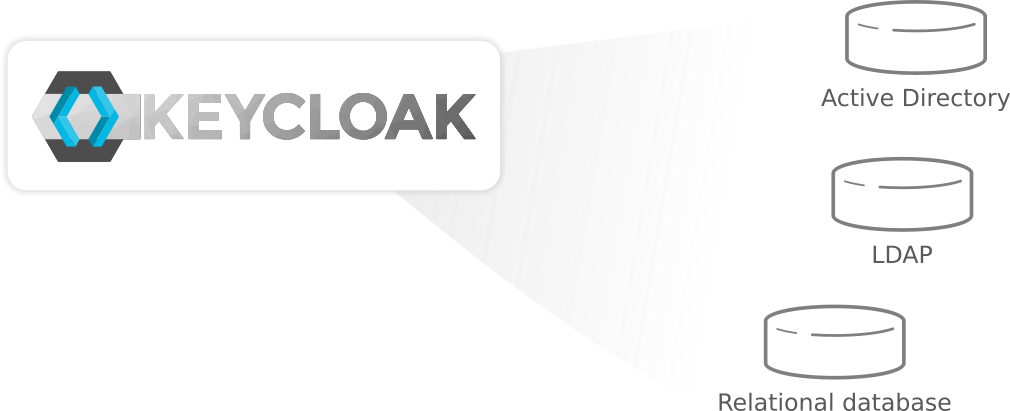
User Federation
Keycloak has built-in support to connect to existing LDAP or Active Directory servers. You can also implement your own provider if you have users in other stores, such as a relational database.
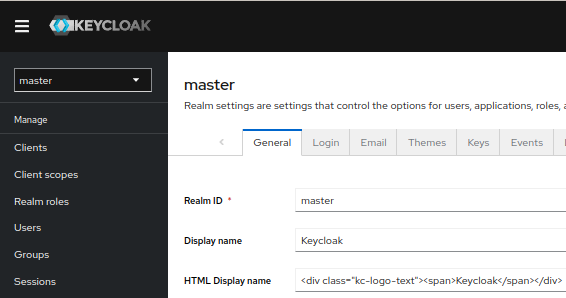
Admin Console
Through the admin console administrators can centrally manage all aspects of the Keycloak server.
They can enable and disable various features. They can configure identity brokering and user federation.
They can create and manage applications and services, and define fine-grained authorization policies.
They can also manage users, including permissions and sessions.
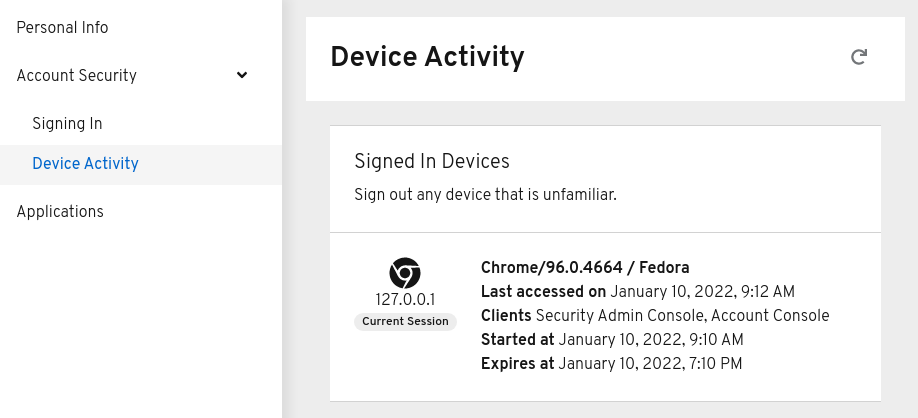
Account Management Console
Through the account management console users can manage their own accounts. They can update the profile, change passwords, and setup two-factor authentication.
Users can also manage sessions as well as view history for the account.
If you've enabled social login or identity brokering users can also link their accounts with additional providers to allow them to authenticate to the same account with different identity providers.
Authorization Services
If role based authorization doesn't cover your needs, Keycloak provides fine-grained authorization services as well. This allows you to manage permissions for all your services from the Keycloak admin console and gives you the power to define exactly the policies you need.
For more information, reach out to the official documentation of Keycloak to solve out all your doubts as https://www.keycloak.org/
OAuth: The Traditional & Dominating Security protocol

Before diving deep in the discussion let's finish up the basic introduction to some basic knowledge which is required to reach out to any decision and revise our concepts.
Authentication
The process of verifying who you are is exercised by web applications by asking you to log in with a username and password which is checked against an existing valid username/ password record to ensure the request is authentic.
Authorization
The process of verifying that you are permitted to do what you asked for or trying to do. Some web applications only allow administrators to edit a web page while allowing normal users to just read them and access information out of them and that's what is referred to as Authorization.
Earlier, API providers adopted Basic Authentication which is the simplest technique to enforce access control to the web. The client sends an HTTP request with an Authentication header which consists of the word "Basic" followed by a space and a string generated by combining username and password with a colon and encoding it with base64 as:-
Authorisation: Basic dxNLcjpwYXNzd29yZA
This method provides the least amount of security as if you use a third-party developer's application, your users might need to share their username and password credentials with them which might create a lot of security chaos and risk private user data with malicious hackers. Applications get full access to your accounts and users cannot limit access to selected resources.
As a result Twitter decided to discontinue support for Basic Authentication for its core API in 2010.
OAuth
To get rid of the problems faced by Basic Authentication, OAuth was introduced in 2007 which is an open standard that allows users to grant access to applications without sharing passwords with them.
OAuth, which stands for Open Authorization, is an open standard and protocol that provides secure, token-based authorization for third-party applications to access resources on behalf of a user without exposing their credentials. It is widely used as an authorization framework in the context of web and mobile applications, enabling users to grant limited access to their resources without sharing their username and password with the third-party application.
The latest version in use is OAuth2.0 which is adopted by several big Champs of the industry like Amazon, Google, Stripe, Facebook, GitHub and Slack. It also allows API providers' users to grant selective permissions. All different applications have different resource requirements from their users and the OAuth framework enables API providers to grant access to one or more resources.

As depicted in the picture above, the application would receive permission to read a user's profile, friend list, or more, but it cannot post on the user's behalf. In the future, if users want to revoke the application's access to their user data, they can simply go to Facebook settings and revoke it without changing their passwords.

So OAuth speaks about the following actors: the Resource Owner (RO), the client, the Authorisation Server (AS), and the Resource Server (RS).
The Resource Owner is the end-user but it could also be the organization, a project, or any other entity. The client is the application that needs to authenticate the user. It can be a web app, a mobile app, … The OAuth server, which is also the OpenID Connect server, is called the Authorization Server (AS) and it is in charge of issuing the tokens and determine who the end-user is. Finally, there is the Resource Server who is serving the resource, such as the API.
JWT, for JSON Web Token, pronounced “jot”, is a special format used by OAuth2 to serialize tokens. It is not the only format but certainly the most commonly used.
OAuth 1.0a:
OAuth 1.0 was the initial version of the OAuth protocol, designed to allow third-party applications to access a user's resources without sharing their credentials. However, OAuth 1.0 had some security vulnerabilities, particularly in its signature process.
In OAuth 1.0, requests were signed with a shared secret key, which meant that if a malicious actor intercepted the request, they could potentially reuse it. To address this, OAuth 1.0a was introduced as an improvement, specifically focusing on enhancing the security of the authentication process.
OAuth 1.0a introduced a more robust signature method, including the use of nonces to prevent replay attacks. Nonce values ensured that the same request couldn't be used multiple times. While OAuth 1.0a addressed many security concerns, its complexity and the need for cryptographic libraries made implementation challenging for developers.
OAuth 2.0:
OAuth 2.0 emerged as a successor to OAuth 1.0, aiming to simplify the authorization process and accommodate a broader range of use cases, including mobile and cloud applications.
The development of OAuth 2.0 started in 2007, led by Eran Hammer and others. It was a complete rewrite of OAuth 1.0, focusing on simplicity, flexibility, and scalability. OAuth 2.0 separated concerns by introducing different grant types for various use cases, allowing developers to choose the most suitable flow for their application.
OAuth 2.0 also delegated the responsibility of security to the HTTPS protocol, relying on secure communication channels to protect sensitive information. This approach simplified the implementation of OAuth 2.0, making it more accessible to developers.
Key Differences:
Simplicity and Flexibility:
- OAuth 2.0 is designed to be simpler and more flexible than OAuth 1.0, making it easier for developers to implement.
Token Types:
- OAuth 2.0 introduces the concept of access tokens and refresh tokens, providing better support for different scenarios, including long-lived sessions and token renewal.
Separation of Concerns:
- OAuth 2.0 separates concerns by having different grant types for various use cases, such as authorization code for server-side applications and implicit grant for client-side applications.
Security Mechanisms:
- OAuth 2.0 relies on HTTPS for secure communication, simplifying the protocol and making it more scalable. In contrast, OAuth 1.0a heavily relied on cryptographic signatures for security.
Token Handling:
- OAuth 2.0 focuses on the handling of tokens, while OAuth 1.0 had a more complex signature process for request verification.
In case you wan to go any deeper specifically in the OAuth Section, about its requirements, history, working reach out to the earlier blog, I published:
Open ID Connect (OIDC)
OpenID Connect (OIDC) is a standard protocol that enables authentication and authorization for securing applications. It is built on the OAuth 2.0 framework to provide additional features for authentication, such as user information exchange and session management. OpenID Connect is an interoperable authentication protocol based on the OAuth 2.0 framework of specifications (IETF RFC 6749 and 6750). It simplifies the way to verify the identity of users based on the authentication performed by an Authorization Server and to obtain user profile information in an interoperable and REST-like manner.
OpenID Connect enables application and website developers to launch sign-in flows and receive verifiable assertions about users across Web-based, mobile, and JavaScript clients. And the specification suite is extensible to support a range of optional features such as encryption of identity data, discovery of OpenID Providers, and session logout. OIDC can also simplify the user experience by enabling Single Sign-On (SSO), which allows users to authenticate once and then access multiple applications without having to log in again.
For developers, it provides a secure and verifiable answer to the question “What is the identity of the person currently using the browser or mobile app that is connected?” Best of all, it removes the responsibility of setting, storing, and managing passwords which is frequently associated with credential-based data breaches.

There are system-level APIs built into the Android operating system to provide OpenID Connect services. OpenID Connect can also accessed by interacting with the built-in system browser on mobile and desktop platforms; a variety of libraries are under construction to simplify this process.
While we have OIDC, but it was built on top of Open ID which was the earlier version build to solve the loopholes of OAuth, let's study about the Open ID as well in details and then highlight the major difference between the Open ID and Open ID Connect and why was OIDC was launched even after having OID:
OpenID:
OpenID is an open standard and decentralized authentication protocol. It enables users to be authenticated across different websites and applications using a single digital identity, without needing to create separate credentials for each site.
Versions:
OpenID has gone through several versions. OpenID 1.0 and OpenID 2.0 were early versions of the protocol, but they faced challenges related to adoption and interoperability.
Architecture:
OpenID operates on a decentralized architecture. It involves three main parties: the user, the relying party (RP), and the identity provider (IdP).
User (End-User):
The individual who uses the OpenID authentication to access various services.
Relying Party (RP):
The website or application that wants to authenticate the user. It relies on the identity provider to verify the user's identity.
Identity Provider (IdP):
The service that authenticates the user and vouches for their identity. The IdP confirms to the RP that the user is who they claim to be.
Authentication Flow:
The typical authentication flow involves the following steps:
The user initiates the authentication process by providing their OpenID to the RP.
The RP redirects the user to the IdP, passing along the OpenID.
The IdP authenticates the user.
Upon successful authentication, the IdP issues a token or assertion to the RP, confirming the user's identity.
The RP can then grant access to the user based on the authentication result.
Challenges and Evolution:
OpenID 2.0 faced some issues, including varying levels of support among providers and complexities in implementation. These challenges led to the development of newer protocols, including OpenID Connect.
While OpenID had widespread adoption at one point, its usage has somewhat diminished in favor of more modern authentication protocols like OAuth 2.0 and OpenID Connect.
Benefits:
Single Sign-On (SSO): Users can use a single set of credentials to access multiple services.
User Control: Users have more control over their identity information and can choose which attributes to share with relying parties.
Decentralization: The decentralized nature of OpenID reduces the need for websites to manage user credentials.
OpenID is commonly used in scenarios where users want a seamless experience across different websites without the need to create separate accounts for each.
Major Difference between the Open ID & Open ID Connect:
Let's measure out the major points standing on which Open ID Connect was launched and had gained lot of popularity & Adoption in the domain, even after having Open ID at the first place:
| Feature/Aspect | OpenID | OpenID Connect (OIDC) |
| Focus | Primarily focused on user authentication. | An authentication layer built on top of OAuth 2.0, providing both authentication and authorization. |
| Versioning | OpenID had versions like 1.0 and 2.0. | OIDC is an extension of OAuth 2.0 and does not have a versioning system independent of OAuth. |
| Underlying Protocol | Utilizes the OpenID protocol. | Extends OAuth 2.0, inheriting OAuth's capabilities for authorization and introduces additional features for authentication. |
| Token Types | Primarily focused on user authentication tokens. | Introduces the ID Token as a JWT (JSON Web Token) for identity verification. Also uses Access Tokens for authorization purposes. |
| Authentication Flows | Different versions had various flows. | Supports various OAuth 2.0 flows like Authorization Code Flow, Implicit Flow, Hybrid Flow, etc., enabling different authentication scenarios. |
| User Information | Dependent on the implementation and the version. | Provides a standardized UserInfo Endpoint for clients to obtain additional information about the authenticated user, promoting consistency. |
| Security Considerations | Security measures varied across implementations and versions. | Addresses security concerns by leveraging the security mechanisms of OAuth 2.0, introducing ID Tokens to enhance identity verification. |
| Claims and Standardization | Limited standardization in earlier versions. | Introduces standardized claims in the ID Token, allowing consistent representation of user attributes. Standard claims include sub (subject), name, given_name, family_name, etc. |
| Decentralization | Utilizes a decentralized architecture. | Built on top of OAuth 2.0, providing a standardized way for decentralized authentication, allowing users to authenticate with various relying parties using a single identity. |
| Current Adoption | Usage somewhat diminished in favor of more modern protocols. | Gained widespread adoption and continues to be widely used, especially in modern web and mobile applications. OIDC has become the prevalent choice for identity and access management. |
| Extensibility | Limited extensibility in earlier versions. | Designed with extensibility in mind, allowing for the incorporation of additional features and custom claims. |
| Flexibility | Limited flexibility in terms of supported scenarios. | Provides flexibility in authentication scenarios through various OAuth 2.0 flows, catering to different types of client applications. |
| Use Cases | Commonly used for single sign-on scenarios. | Widely used in scenarios requiring both authentication and authorization, offering a comprehensive solution for securing user identity in modern applications. |
How OIDC Works?
In OIDC, a user logs in to an application using their identity provider (IDP) credentials, such as their username and password. The IDP then sends an ID token to the application, which contains information about the user’s identity, such as their name and email address. This token is then used to authenticate the user and to provide access to protected resources.

It enables an Internet identity ecosystem through easy integration and support, security and privacy-preserving configuration, interoperability, wide support of clients and devices, and enabling any entity to be an OpenID Provider (OP).
The OpenID Connect protocol, in abstract, follows these steps:
End user navigates to a website or web application via a browser.
End user clicks sign-in and types their username and password.
The RP (Client) sends a request to the OpenID Provider (OP).
The OP authenticates the User and obtains authorization.
The OP responds with an Identity Token and usually an Access Token.
The RP can send a request with the Access Token to the User device.
The UserInfo Endpoint returns Claims about the End-User.
What is Self-Certification

Self-certification is a formal declaration by an entity that its identified deployment of a product or service conforms, through a process of conformance testing, to a specific conformance profile of the OpenID Connect protocol. Customers often need an assurance that their deployment conforms, and certification can help provide that assurance.
Usage of Certifications in OIDC:
Entities looking to use or rely on a deployment of a product or service that implements a specific conformance profile of the OpenID Connect protocol often need some assurance that the deployment actually conforms to the profile. A certification can help provide that assurance.
Things to keep in mind while adopting Self-Certifications:
When an entity makes a self-certification, it puts its reputation on the line. In addition, it undertakes potential liability for damages suffered by those who rely on its self-certification in the event that the self-certification is not accurate. And it also exposes itself to potential liability under government regulatory statutes and regulations, such as laws that prohibit unfair and deceptive business practices.
How Self-Certification is different form Third-Party Certification?
In the case of self-certification, the party implementing a deployment of a product or service conducts its own review to determine whether its deployment complies with a specific conformance profile, and upon successful completion of such review, issues its own declaration of compliance. In the case of third-party certification, someone other than the entity deploying the product or service (usually a specially accredited and trustworthy auditor or assessor authorized to conduct such a review) reviews, tests, assesses, and verifies that the entity’s deployment of the product or service conforms to a specific conformance profile, and then issues a statement to the effect that it has conducted the specified assessment, and certifies that the entity’s deployment of the product or service conforms to the specified conformance profile.
In the case of self-certification, the trustworthiness of the certification is a function of the trustworthiness of the entity that is assessing itself. In the case of third-party certification, the trustworthiness of the certification is a function of the trustworthiness of the assessing entities/certifying entity as well as the trustworthiness of the entity requesting the assessment. Self-certification is also easier, quicker, and significantly cheaper than third-party certification.
Now, we’ll use Quarkus, Kubernetes native Java framework with Keycloak to implement the above OpenID Connect authorization code flow. Because Quarkus provides an out-of-box OpenID Connect (OIDC) extension to verify bearer access tokens and authenticate user credentials along with the authorization code flow.
In case you want to go really deep in the implementation, testing, security and project details of Open ID Connect, you can head to the CNCF Documentation on Open ID Connect with Keycloak.
Create a new secured APIs project
Let’s create a new project using the Quarkus command which simplifies generating a project and managing Quarkus extensions programmatically. Find more information about Quarkus command here. Run the following command.
quarkus create secured-apis-keycloak-quarkus
The output should look like this.
Creating an app (default project type, see --help).
Looking for the newly published extensions in registry.quarkus.io
-----------

applying codestarts...
📚 java
🔨 maven
📦 quarkus
📝 config-properties
🔧 dockerfiles
🔧 maven-wrapper
🚀 resteasy-reactive-codestart

-----------
[SUCCESS] ✅  quarkus project has been successfully generated in:
--> /Users/danieloh/Downloads/demo/secured-apis-keycloak-quarkus
-----------
Navigate into this directory and get started: quarkus dev
Navigate into this directory and get started: quarkus dev
Note that you can find the solution here.
Start Live Coding with Quarkus Dev mode
Quarkus provides great developer experiences that can reduce inner loop process time such as writing, compiling, and testing code repeatedly but developers can also have spare time to address outer loop processes such as containerizing images, deploying, and verifying them on Kubernetes.
To use the developer experience, let’s start Quarkus development mode also known as live coding. Run the following Quarkus command.
quarkus dev
The output should look like this.
 --/ __ \/ / / / _ | / _ \/ //_/ / / / __/
 -/ /_/ / /_/ / __ |/ , _/ ,< / /_/ /\ \
--\___\_\____/_/ |_/_/|_/_/|_|\____/___/

INFO  [io.quarkus] (Quarkus Main Thread) secured-apis-keycloak-quarkus 1.0.0-SNAPSHOT on JVM (powered by Quarkus xx.xx.xx.Final) started in 1.066s. Listening on: http://localhost:8080

INFO  [io.quarkus] (Quarkus Main Thread) Profile dev activated. Live Coding activated.
INFO  [io.quarkus] (Quarkus Main Thread) Installed features: [cdi, resteasy-reactive, smallrye-context-propagation, vertx]

--
Tests paused
Press [r] to resume testing, [o] Toggle test output, [:] for the terminal, [h] for more options>
Access a generated REST API using the curl command.
curl http://localhost:8080/hello
The output should look like this.
Hello from RESTEasy Reactive
Enable Keycloak Integration into Quarkus
Add the following 2 extensions to integrate the Keycloak server with OIDC authentication and enable swagger UI to access secured REST APIs.
quarkus ext add oidc smallrye-openapi
The output should look like this.
SUCCESS] ✅ Extension io.quarkus:quarkus-oidc has been installed
[SUCCESS] ✅ Extension io.quarkus:quarkus-smallrye-openapi has been installed
Here is another reason why you need Quarkus for the Keycloak integration. Quarkus Dev Services stands up the Keycloak container image based on Testcontainers automatically when you add the oidc extension to Quarkus dev mode as long as you’re running a container runtime locally such as Docker or Podman.
Press “c” on the terminal that you’re running Quarkus dev mode. Then, you can see the details of the Keycloak dev service.
== Dev Services

keycloak
  Container:        c09e6f966760/angry_jones  quay.io/keycloak/keycloak:21.0.2
  Network:          bridge - 0.0.0.0:64266->8080/tcp
  Exec command:     docker exec -it c09e6f966760 /bin/bash
  Injected config:  - client.quarkus.oidc.auth-server-url=http://localhost:64266/realms/quarkus
                    - keycloak.realms=quarkus
                    - keycloak.url=http://localhost:64266
                    - oidc.users=alice=alice,bob=bob
                    - quarkus.oidc.application-type=service
                    - quarkus.oidc.auth-server-url=http://localhost:64266/realms/quarkus
                    - quarkus.oidc.client-id=quarkus-app
                    - quarkus.oidc.credentials.secret=secret
You can also visit Quarkus Dev UI by pressing “d” on the terminal that you’re running Quarkus dev mode or access localhost:8080/q/dev-ui/dev-services directly.
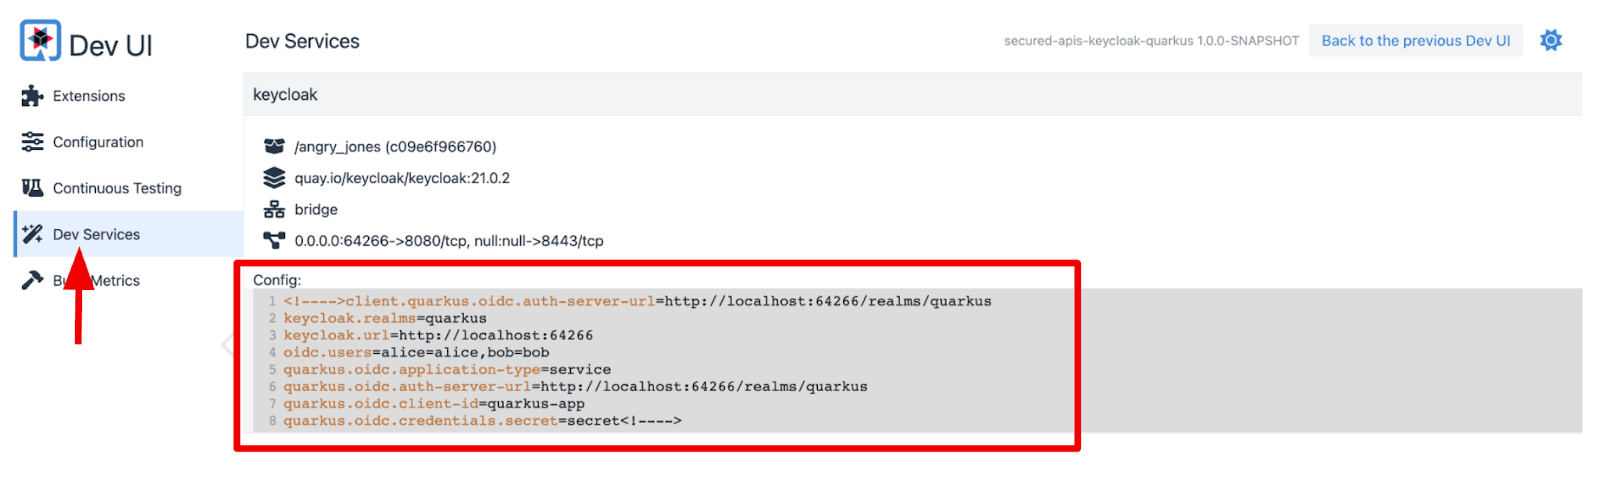
Figure 2. Quarkus Dev Service for Keycloak
Developers don’t need to specify the keys and values for OIDC and Keycloak configurations manually. Instead, Quarkus Dev Service for Keycloak set them for developers automatically which can increase developer productivity.
Let’s explore the Keycloak server in terms of pre-defined Realms, Users, and Groups. Go back to the Quarkus Dev UI, then select “Back to the previous Dev UI” on the right top. You can also access localhost:8080/q/dev-v1 directly.
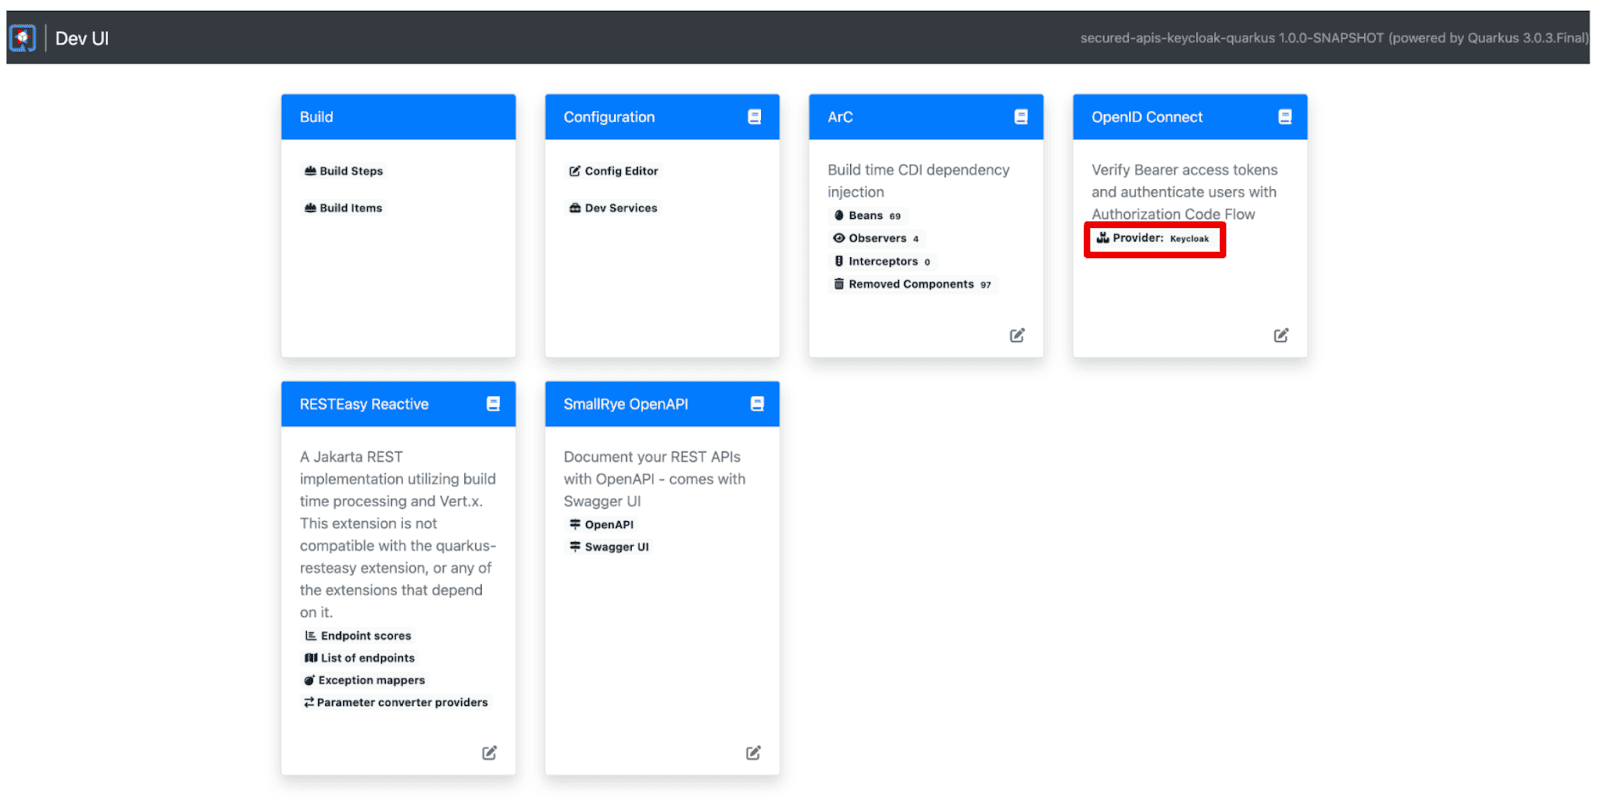
Figure 3. Back to the previous Dev UI
Select “Provider: keycloak” to access the Keycloak admin and single login page for the applications.
Figure 4. Dev UI Version 1
You will see the following page. Select “Keycloak Admin” on the right top. You can also access localhost:64266 directly.

Figure 5. Single application page in Dev UI v1
You will see the Keycloak Admin landing page. Select Administration Console or access localhost:64266/admin/master/console directly.
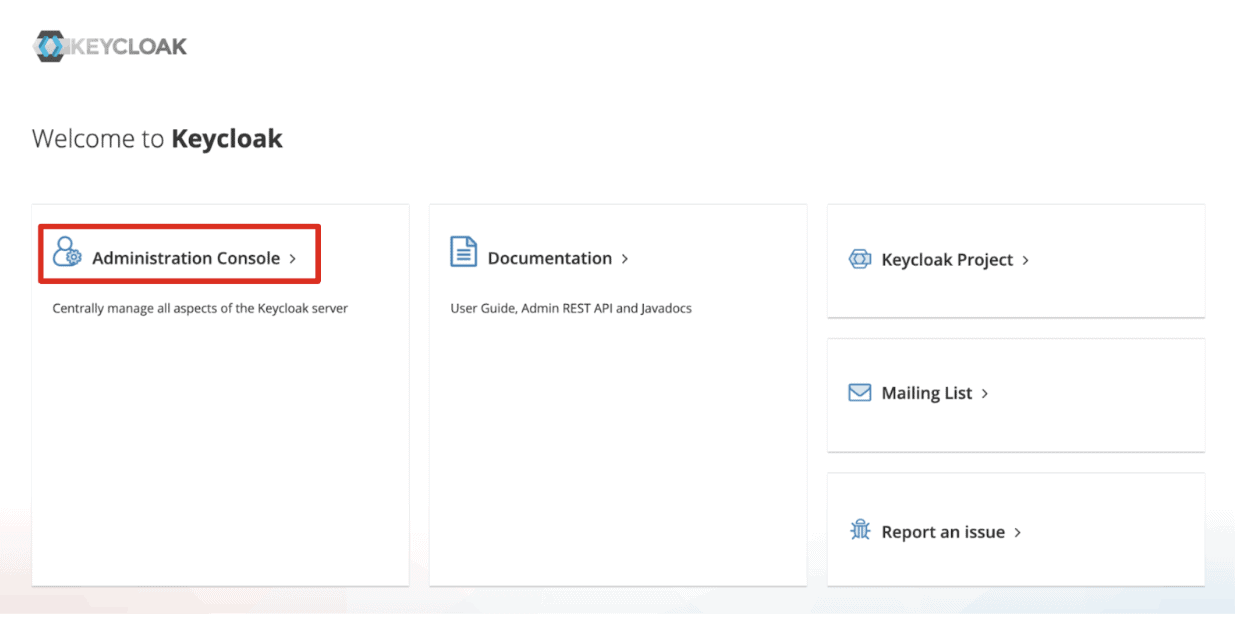
Figure 6. Keycloak Admin Landing page
Key in the following credential.
Username: admin
Password: admin
Select the “quarkus” realm on the left top. Then navigate to “Users” on the left menu. You should see “alice” and “bob” users.
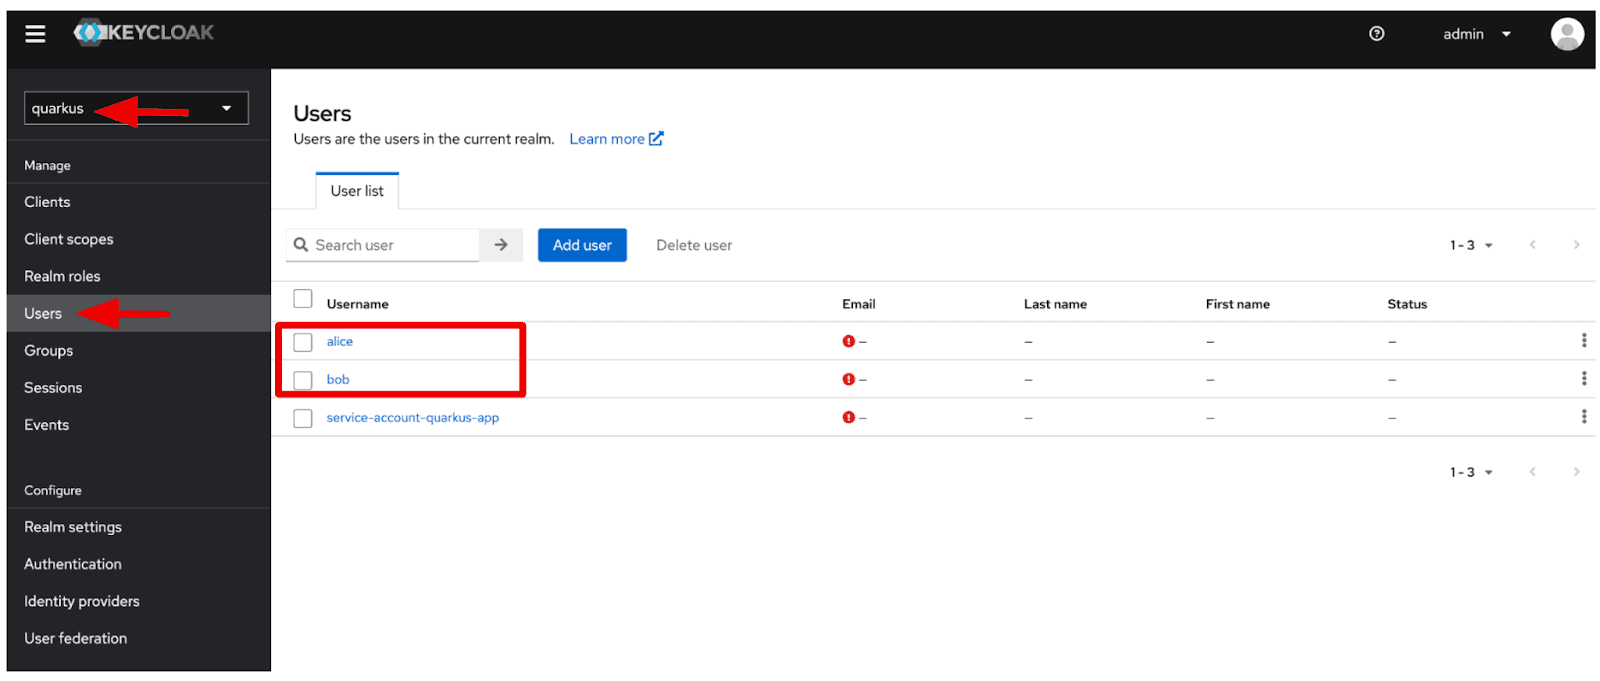
Figure 7. Users in Keycloak Admin Console
When you select “alice”, you can see more information. For example, select the “Role mapping” tab menu, and you will see that “alice” belongs to 2 roles such as “admin” and “user”.
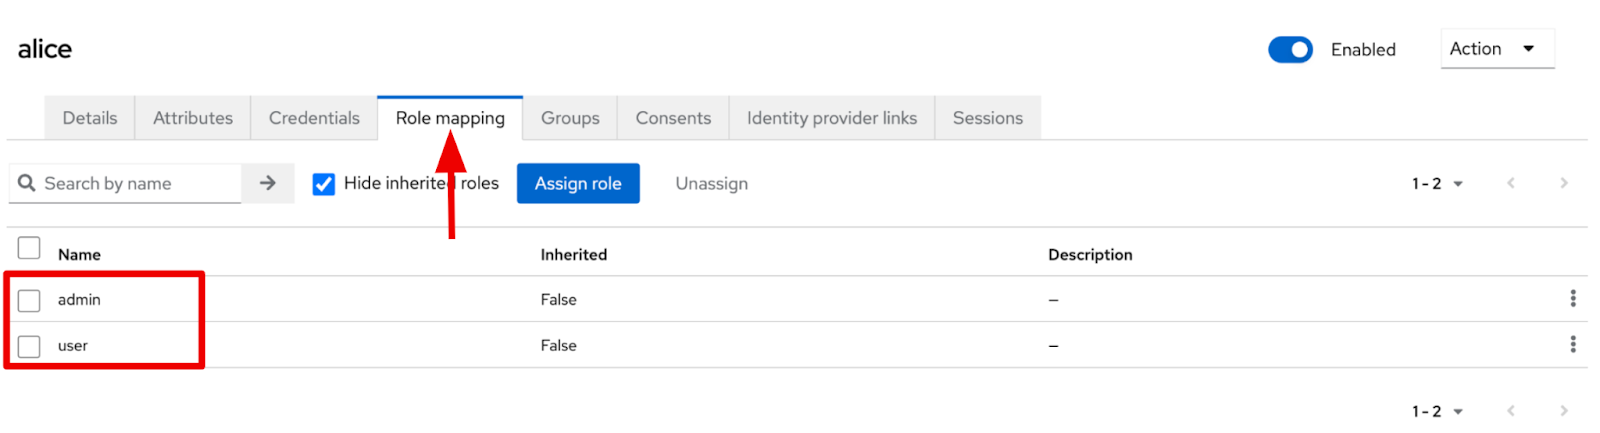
Figure 8. Role mapping of alice
When you select “bob” user, you can see that only “user” role is allocated to the bob user.
Adding RBAC security to the REST APIs
Open the GreetingResource.java file in the src/main/java/org/acme directory. Replace the existing code with the following code.
package org.acme;

import org.eclipse.microprofile.config.inject.ConfigProperty;

import jakarta.annotation.security.RolesAllowed;
import jakarta.ws.rs.GET;
import jakarta.ws.rs.Path;
import jakarta.ws.rs.Produces;
import jakarta.ws.rs.core.MediaType;

@Path("/hello")
public class GreetingResource {

    @ConfigProperty(name = "db.username")
    String username;

    @ConfigProperty(name = "db.password")
    String password;

    @GET
    @Produces(MediaType.TEXT_PLAIN)
    @Path("db")
    @RolesAllowed("admin")
    public String db() {
        return "db.username: " + username + " / db.password: " + password;
    }

    @GET
    @Produces(MediaType.TEXT_PLAIN)
    @RolesAllowed("user")
    public String hello() {
        return "Getting started to secure Cloud Native Microservices with Role-Based Access Control using Keycloak!";
    }
}
Now, you have 2 REST services to get your database credentials (/hello/db) and a welcome message (/hello). Each endpoint is required to have different roles to access the resources. The “/hello/db” endpoint can only be accessed by an admin role but the other endpoint (“/hello”) can be accessed by the admin and user roles.
The second benefit of Quarkus: Enabling RBAC security on your Java applications. The @RolesAllowed annotation simplifies the role setting Keycloak manages on Java methods programmatically.
I hope you got some more data added to your knowledge, soon I will be covering more interesting and useful tools, protocols and project specially related to CNCF Landscape or incubating projects list in the future, which can contribute a lot in making your day-to-day task a lot more easier🚀🔥

If you like my Article then please react to it and connect with me on Twitter if you are also a tech enthusiast. I would love to collaborate with people and share the experience of tech😄😄.
My Twitter Profile: